Agent Settings: Basic
Overview
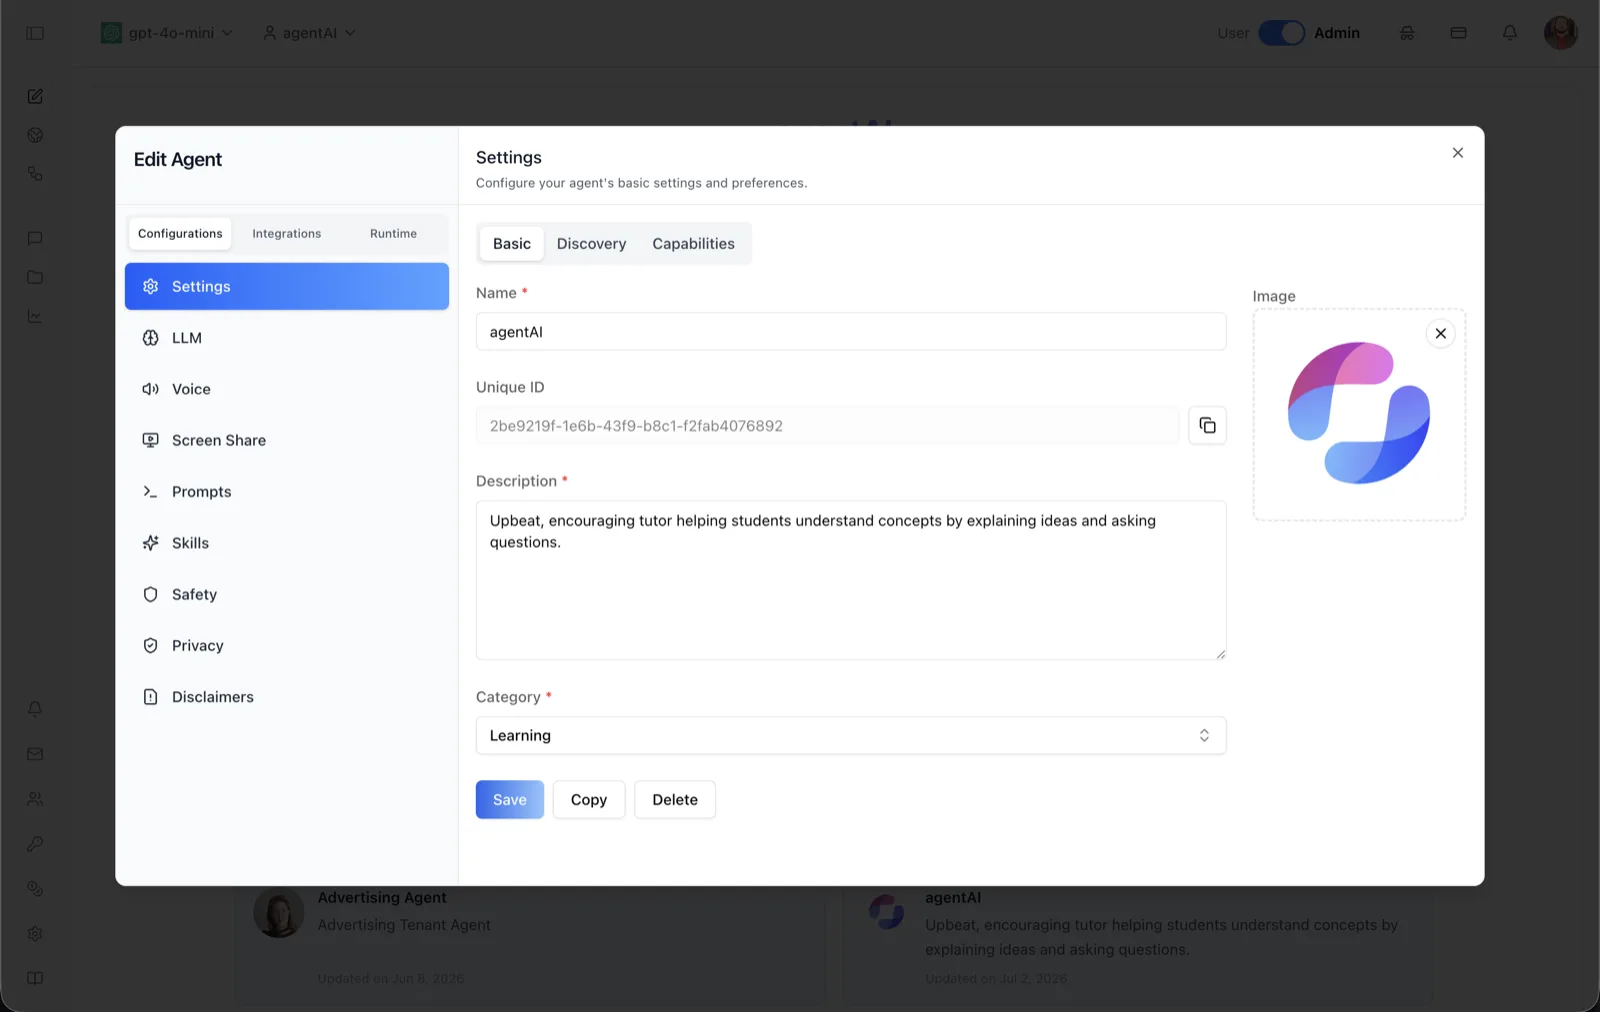
The Basic sub-tab of the Settings panel holds an agent's identity: its name, unique ID, description, category, and avatar image. The panel header reads: "Configure your agent's basic settings and preferences." These fields determine how the agent appears in listings and in the chat interface.
Basic is the first of three sub-tabs at the top of the Settings panel — Basic, Discovery, and Capabilities. All three share one form, so Save submits changes from every sub-tab at once.
To reach this screen, open the Edit Agent modal, stay on the Configurations tab group (alongside Integrations and Runtime), select Settings in the left sidebar, and make sure the Basic sub-tab is active.
Target Audience
Administrator | Agent Builder
Settings Reference
Name (required)
The agent's display name (for example, "agentAI"). This is the name users see when browsing and chatting with the agent. The form will not submit without it — the validation message is "Agent name is required."
Unique ID
A read-only UUID that identifies the agent across the platform (for example, 2be9219f-1e6b-43f9-b8c1-f2fab4076892). Use the copy button next to the field to copy it to the clipboard — a "Unique ID copied to clipboard" confirmation appears. The unique ID is what API calls, embeds, and integrations use to reference this agent.
Description (required)
A short summary of what the agent does and how it behaves (for example, "Upbeat, encouraging tutor helping students understand concepts by explaining ideas and asking questions."). The description is shown on the agent's card in listings. Validation message: "Agent description is required."
Category (required)
A dropdown that files the agent under one of the organization's agent categories (the screenshot shows "Learning"). The category list is loaded from the platform, and the picker is searchable — it shows "Search category..." and reports "No Category found." when nothing matches. Categories drive how agents are grouped on explore/listing pages.
Image
The agent's avatar. Use + Upload to add an image file, and the X button over the current image to remove it. The image appears wherever the agent is listed and in chat.
Save, Copy, Delete
Save persists the whole Settings form (all three sub-tabs). Copy opens a dialog to duplicate the agent; it appears when the agent allows copies (the "Enable copies" capability). Delete opens a confirmation dialog to permanently remove the agent; it appears only for users with delete permission.
How to Use
Step 1: Open the Basic sub-tab
Open your agent's Edit Agent modal, keep Configurations selected, click Settings in the sidebar. The Basic sub-tab is selected by default.
Step 2: Name and describe the agent
Enter a Name and a Description. Both are required. Write the description as the one-liner you want users to see on the agent's card.
Step 3: Pick a category
Choose a Category from the dropdown so the agent is grouped correctly in listings. Type in the picker to search when the list is long.
Step 4: Add an image
Click + Upload under Image and choose an avatar file. To replace it, remove the current image with the X button first.
Step 5: Save
Click Save. A success message confirms the agent was updated. If you need the agent's UUID for an API call or embed, copy it from the Unique ID field.