Organization Settings: Billing
Overview
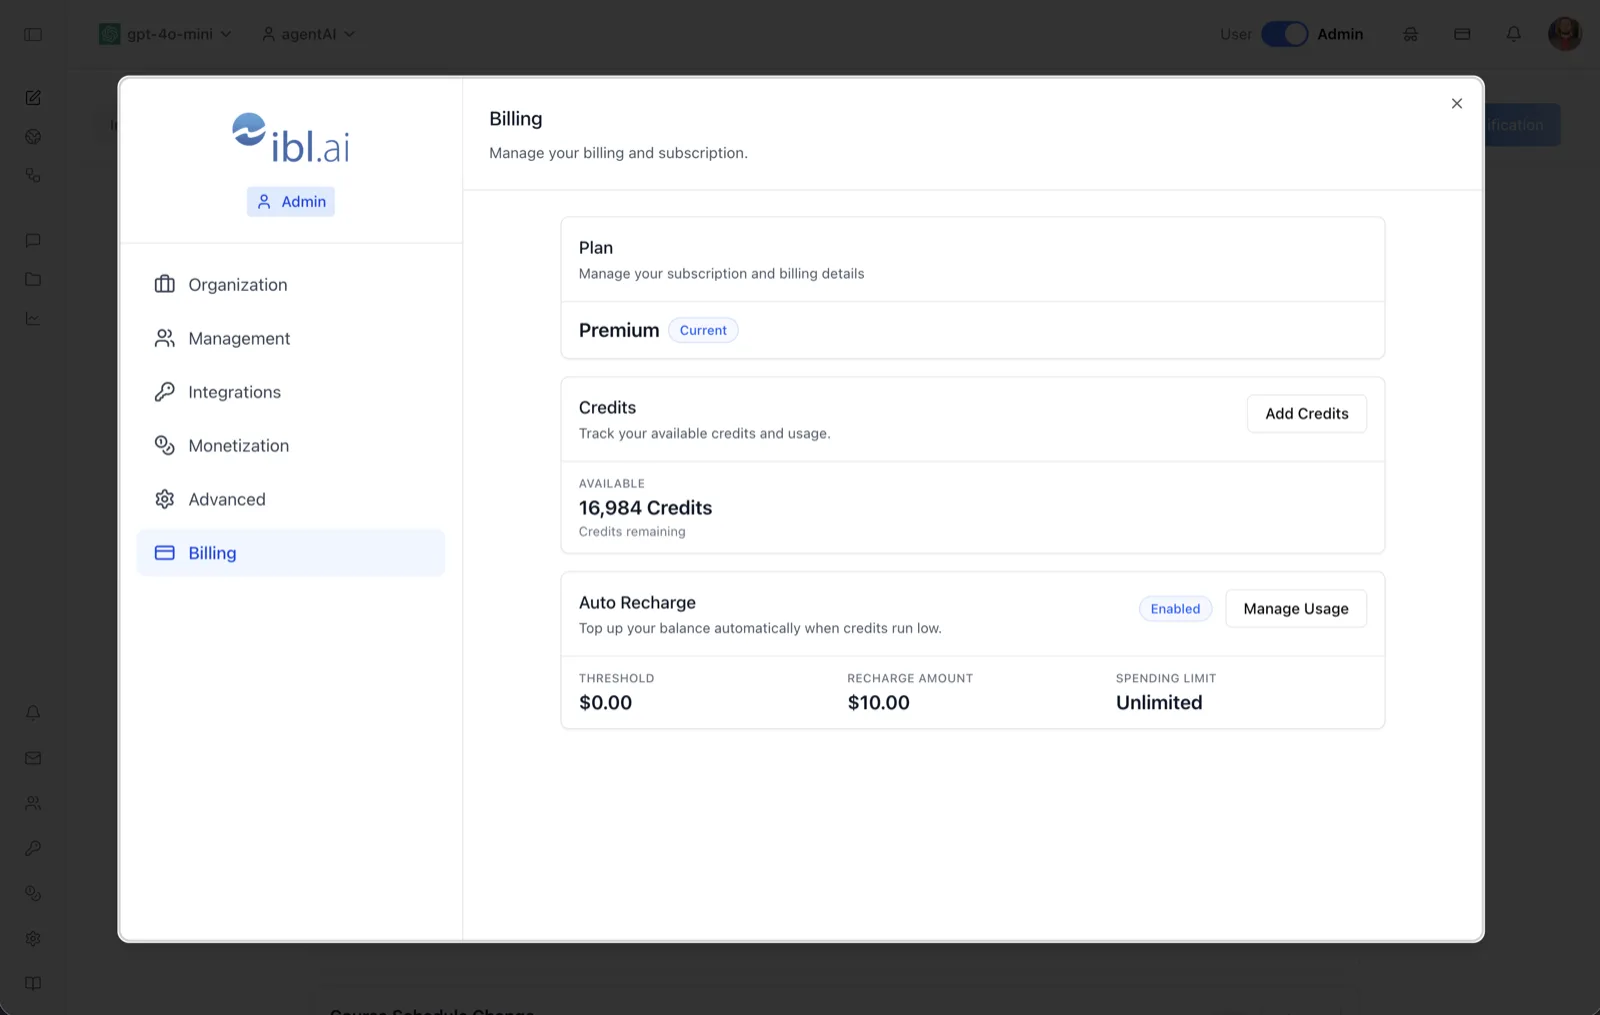
The Billing page manages what the organization pays for and what it is allowed to spend. The header reads "Billing — Manage your billing and subscription," and the page is divided into three tabs.
Plan & Credits is the account: the subscription tier, the credit balance, and how it is topped up. Spend Limits is the workspace-wide ceiling on LLM spend — one limit covering everything every agent and user consumes. Agent Limits is the cross-agent view: every agent that has a spend cap, in one table, with each row opening that agent's own limits.
OS meters usage in credits rather than per-seat licenses: the balance is drawn down as the organization consumes the platform, and it can be topped up manually or automatically. Payments run through Stripe using the payment method on file.
To reach it, switch the top-bar toggle to Admin, open the settings dialog, and select Billing in the left sidebar.
Target Audience
Administrator | Finance / Operations
Sections and Controls
Plan & Credits
Plan
Shows the current subscription tier with a Current badge — Premium in the screenshot; other states are Free and Trial. Free and Trial plans display an Upgrade button that starts a Stripe checkout; Premium plans show their renewal date, and trials show days remaining.
Credits — Available
The credit balance ("Track your available credits and usage"), e.g. "16,984 Credits — Credits remaining," shown alongside its dollar equivalent and the conversion rate in force. When applicable the card also shows Consumed (credits used this period) and Resets on (the next reset date).
Add Credits
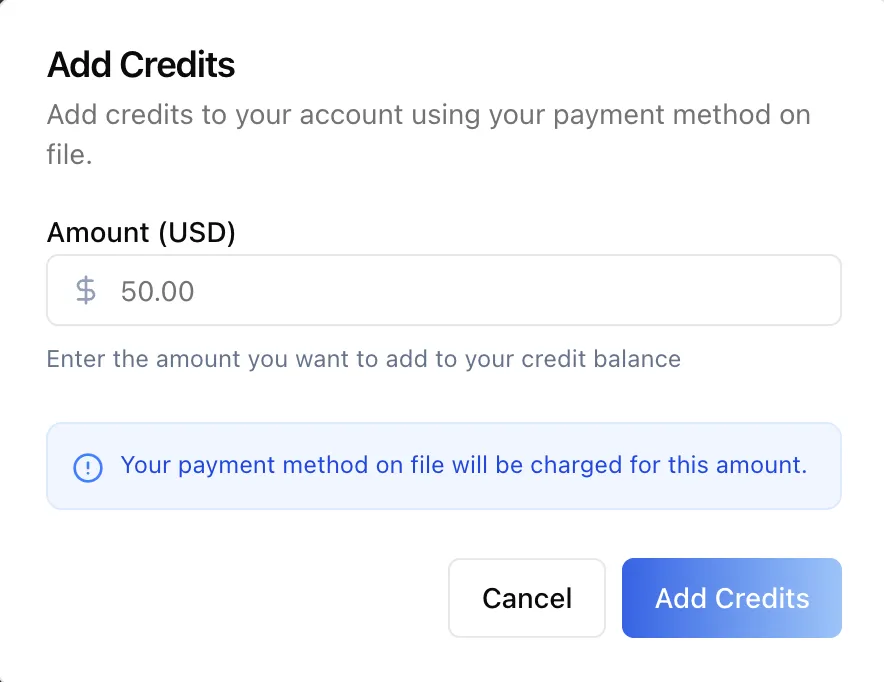
Opens a dialog to top up manually: enter an Amount (USD) and confirm. The dialog notes "Your payment method on file will be charged for this amount." If no payment method exists yet, the button is replaced by Manage Billing, which opens the Stripe portal to add one.
Auto Recharge
"Top up your balance automatically when credits run low." The card shows an Enabled/Disabled badge and, when enabled, three stats: Threshold (balance at which a recharge triggers, $0.00 in the screenshot), Recharge Amount (how much is added, $10.00), and Spending Limit (a cap on automatic spending — Unlimited when no cap is set).
Manage Usage
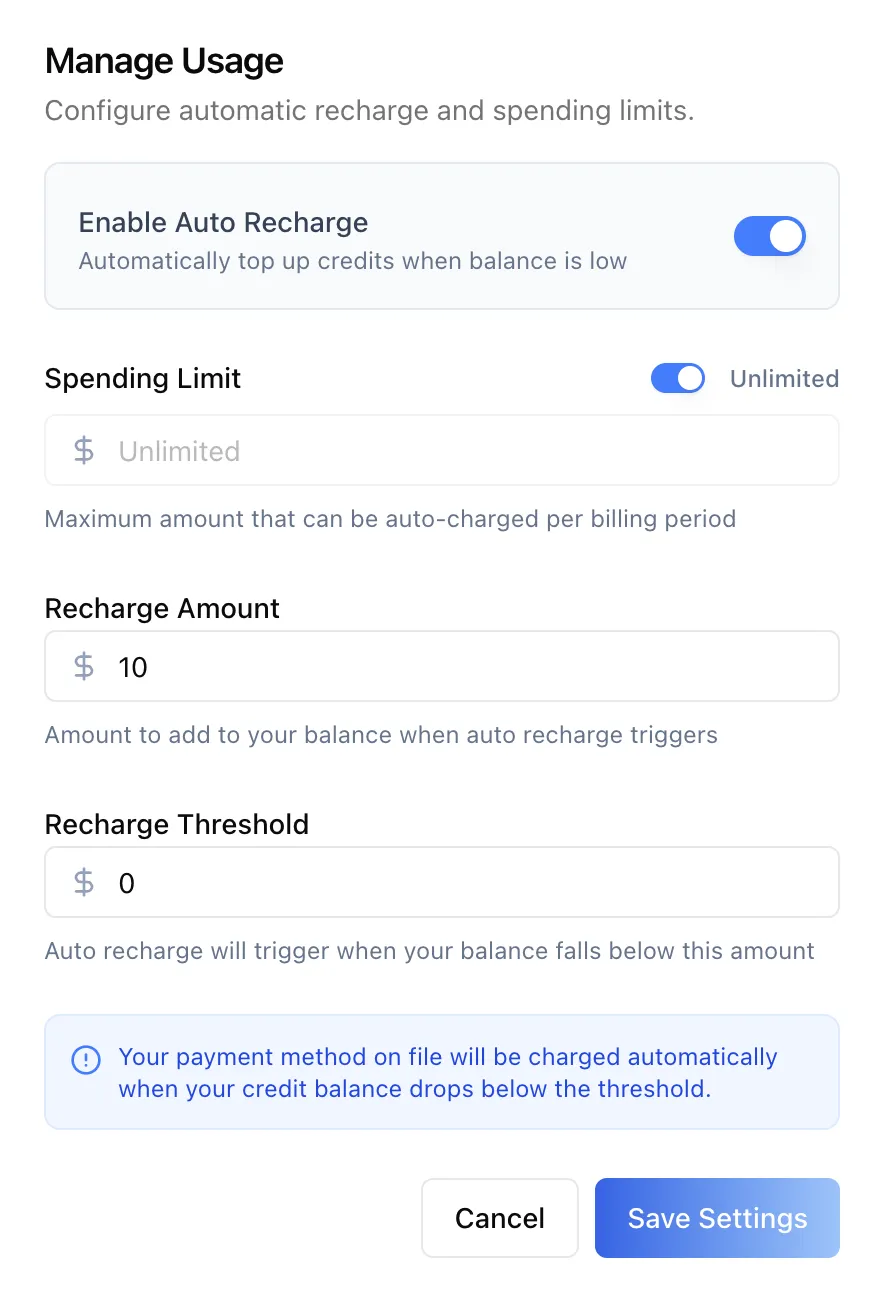
Opens the auto-recharge dialog where you toggle the feature and set the threshold, recharge amount, and spending limit (with an Unlimited option). Enabling with empty values applies sensible defaults ($5 threshold, $16 recharge). Auto recharge is available on paid plans once a payment method is on file.
Spend Limits
Workspace-wide limit
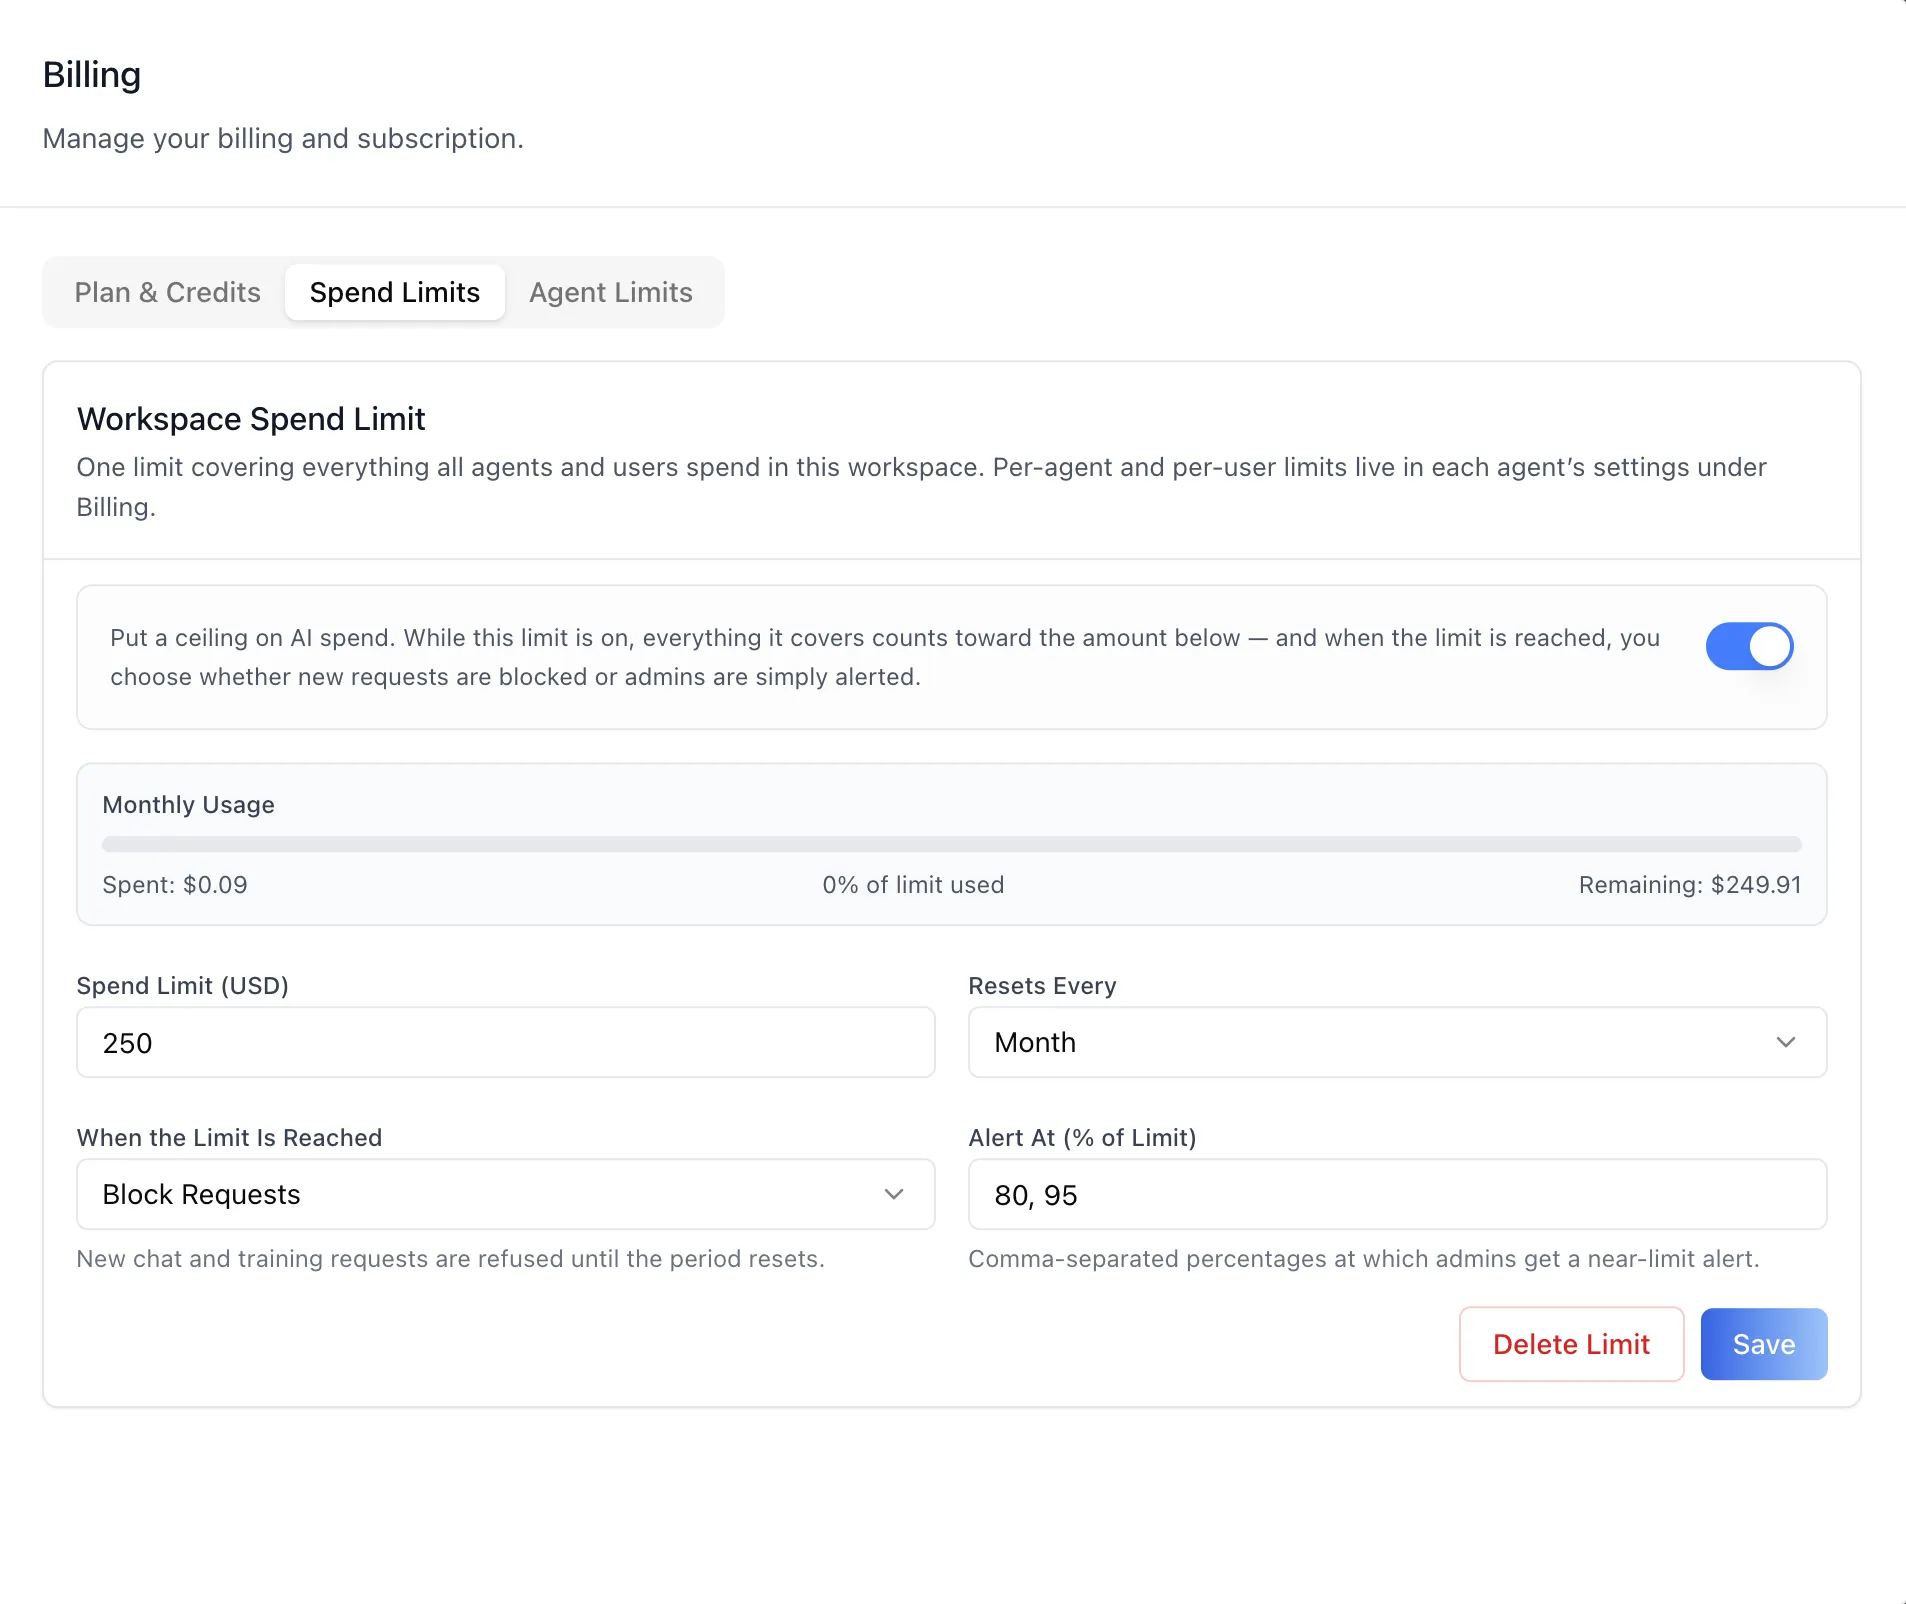
One ceiling covering everything every agent and every user spends in this workspace. It is the same editor as the per-agent one, at the widest scope: an enable toggle, a usage strip once a limit exists, Spend Limit (USD), Resets Every (Day / Week / Month / Year), When the Limit Is Reached (Block Requests or Alert Only), Alert At (% of Limit), and Save / Delete Limit.
Actual spend, before you set a limit
Until a limit exists, this tab shows what the workspace has actually spent — this month and all time — so the number you choose is grounded in real usage rather than guessed.
Agent Limits
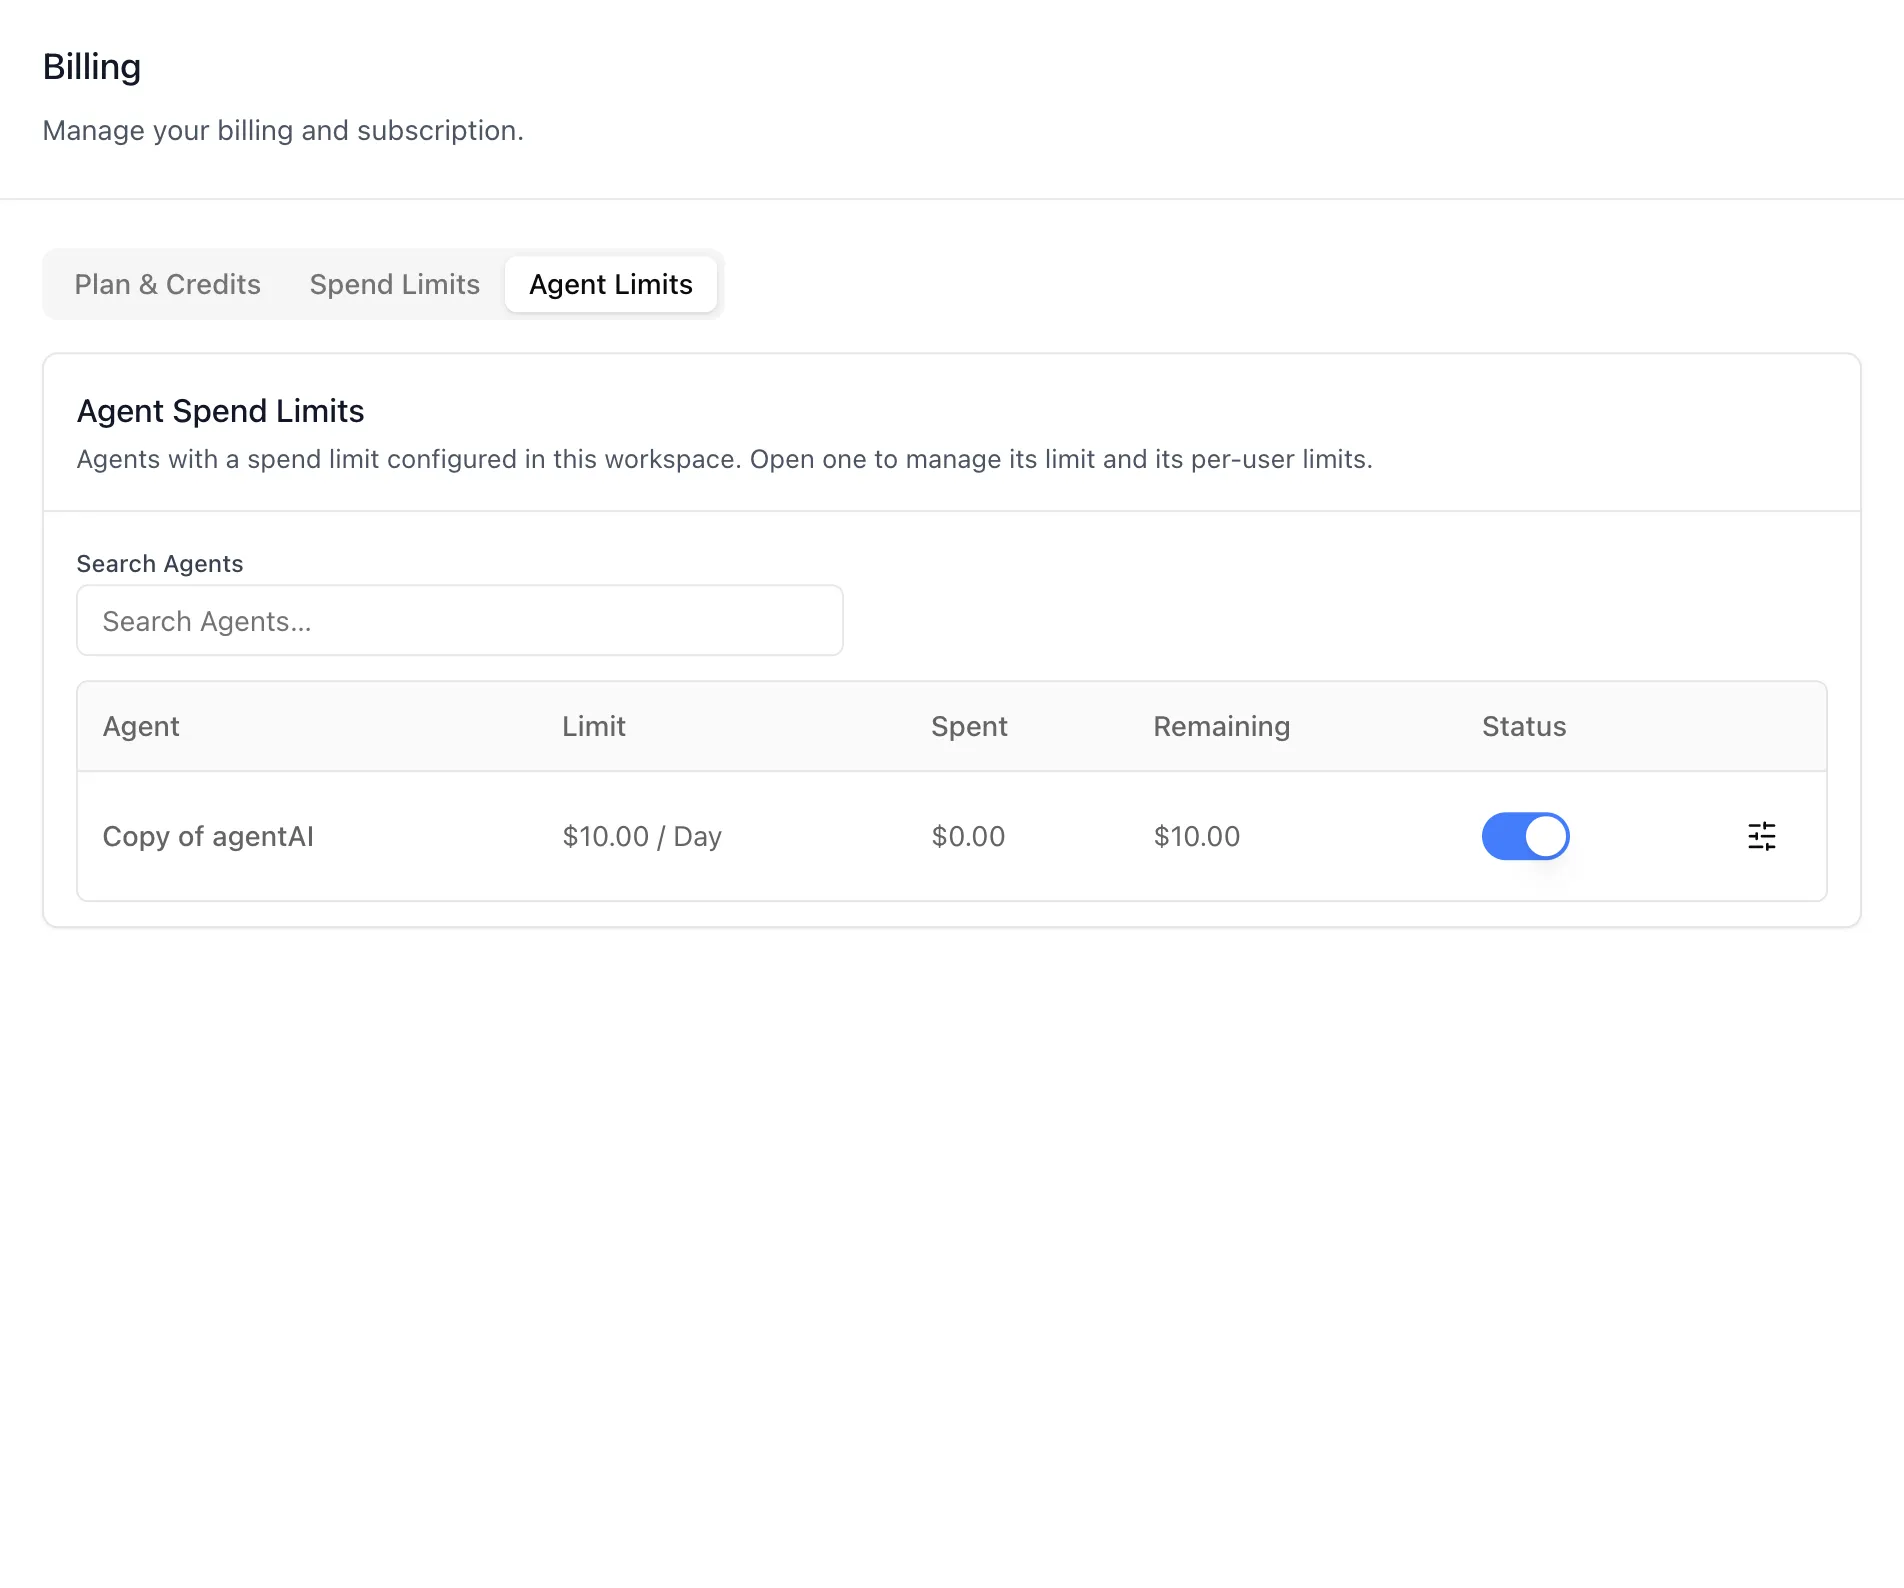
Agent Limits table
Every agent in the workspace that has a spend cap, in one table: Agent, Limit written as amount and period ($10.00 / Day), Spent, Remaining, and Status — a toggle that saves immediately, carrying Exceeded and Alert-only badges where they apply.
Search Agents
Filters the table from two characters up. Searching for an agent that has no cap yet offers a Set a limit button for it, which is how a limit gets created from this view rather than from the agent itself.
Manage
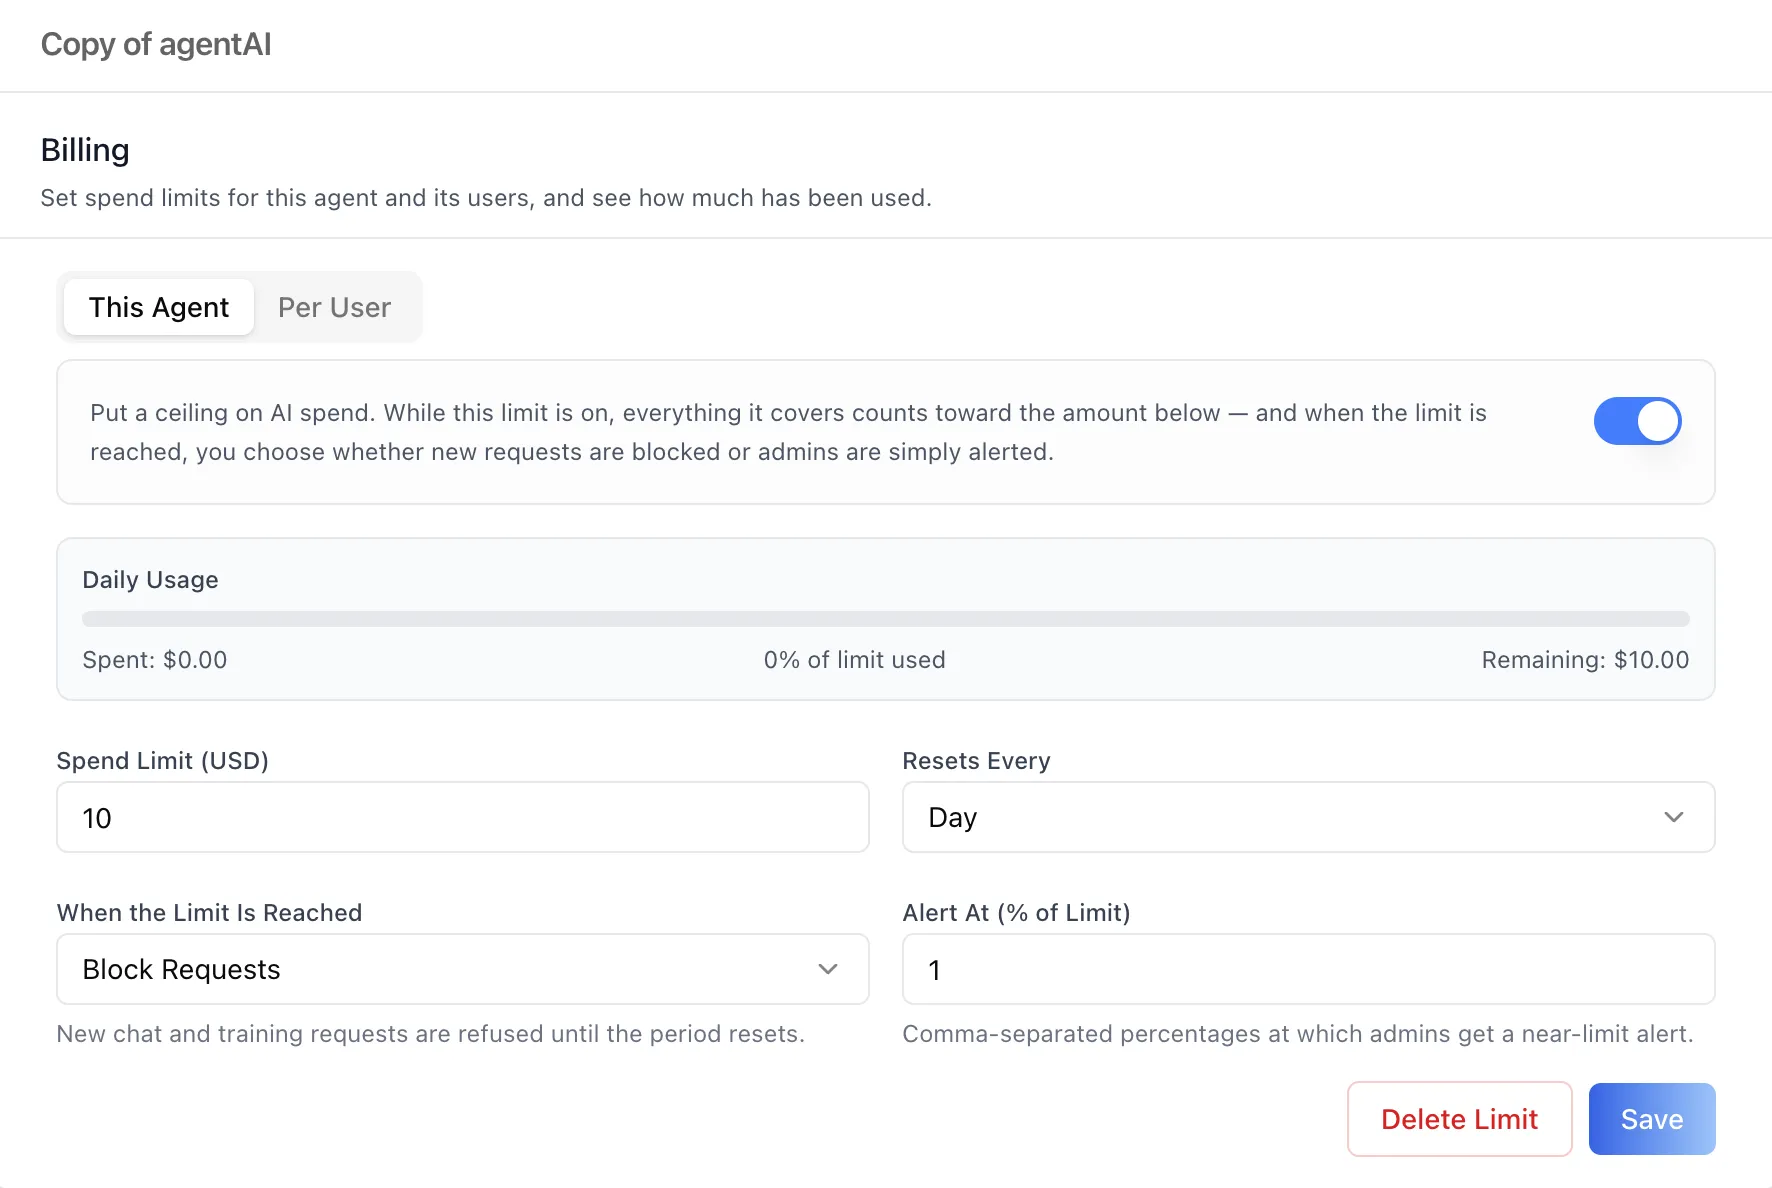
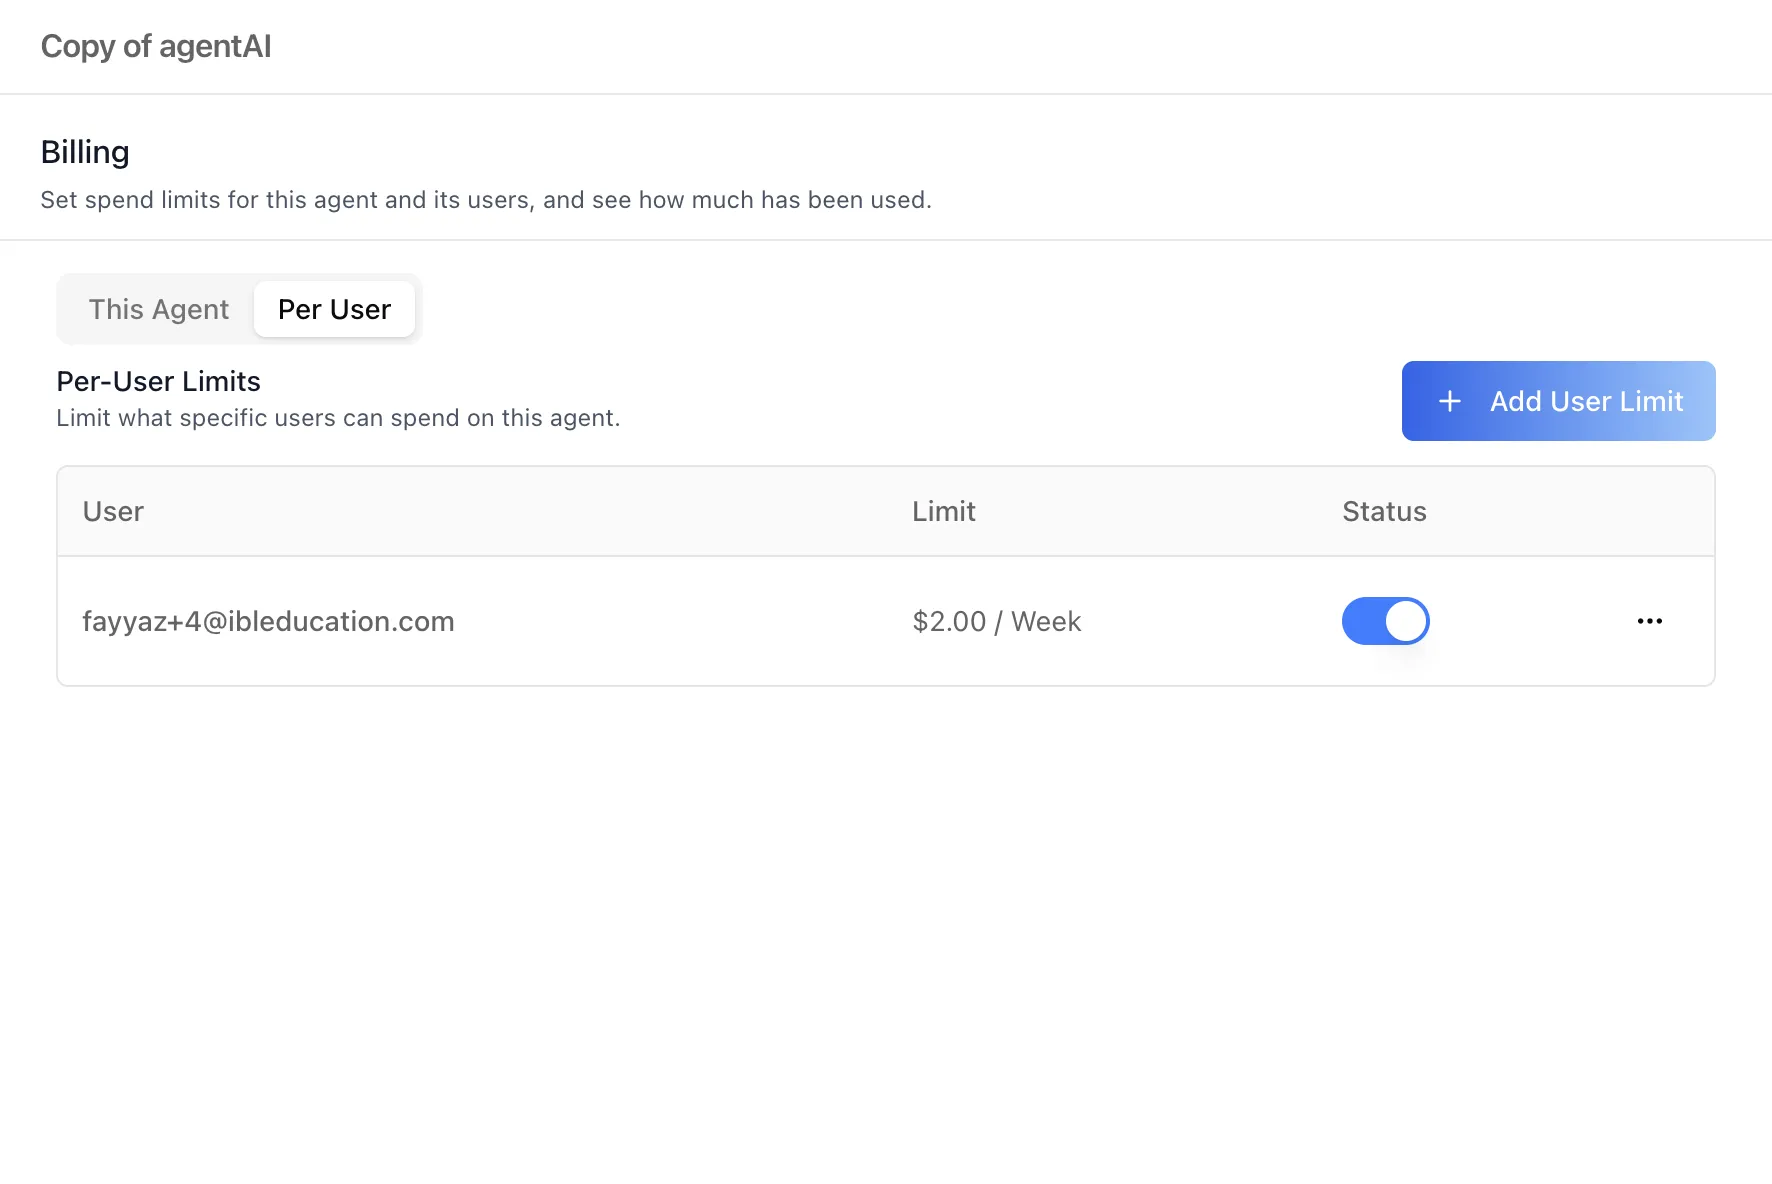
Opens that agent's full Billing editor in a popup titled with the agent's name — the same This Agent and Per User sub-tabs documented in Agent Settings: Billing, so per-user limits can be managed without leaving this page.
How to Use
Step 1: Open Billing
In Admin mode, open the settings dialog and click Billing in the left sidebar.
Step 2: Check your plan
Confirm the plan card shows the expected tier. On Free or Trial, click Upgrade to move to Premium via Stripe checkout.
Step 3: Add a payment method
If prompted with Manage Billing, follow it to the Stripe portal and save a payment method. This unlocks Add Credits and Auto Recharge.
Step 4: Top up credits
Click Add Credits, enter a USD amount, and confirm. The charge goes to your payment method on file and the balance updates.
Step 5: Configure auto recharge
Click Manage Usage, enable auto recharge, and set the threshold, recharge amount, and an optional spending limit. Your balance now tops up automatically whenever it falls below the threshold, never exceeding the limit you set.
Step 6: Set the workspace-wide spend limit
Open Spend Limits. Before setting anything, read the actual spend shown there — this month and all time — and pick a ceiling above normal usage. Enter the amount, choose how often it resets, and decide whether reaching it should Block Requests or only Alert. Save.
Step 7: Review the agents that have their own limits
Open Agent Limits for the whole picture: which agents are capped, what they have spent, and what is left. The Status toggle turns a cap off without deleting it.
Step 8: Set or adjust one agent's limits
Search for the agent and use Manage to open its own Billing editor in place — the agent's cap on This Agent, and per-person caps on Per User. An agent with no cap yet offers Set a limit from the search result.
Behavior Notes
- Three scopes, tightest wins. This page holds the workspace-wide limit; agents and individual users have their own on the agent's Billing panel. A request has to clear every limit that applies to it.
- Enforcement is server-side. A workspace limit set to Block Requests refuses chat and training requests once exceeded, with a distinct error that can be told apart from a provider rate limit — it is not an advisory number.
- The credit conversion rate is per-environment. The dollar equivalent shown beside the balance comes from your account's own rate, not a fixed figure.
- Plan state changes what the page offers. Free and Trial plans see Upgrade and no Add Credits or Auto Recharge; a paid plan without a payment method sees Manage Billing instead of Add Credits, and Auto Recharge stays hidden until a payment method is on file.
- Each tab authorizes separately. Spend Limits and Agent Limits are permission-gated independently and show their own denied panel — being unable to see them does not hide Plan & Credits.
- An empty first run is normal. Until a limit is saved there is no record to read, and the tab treats that as its first-run state rather than an error.