Agent Settings: Embed
Overview
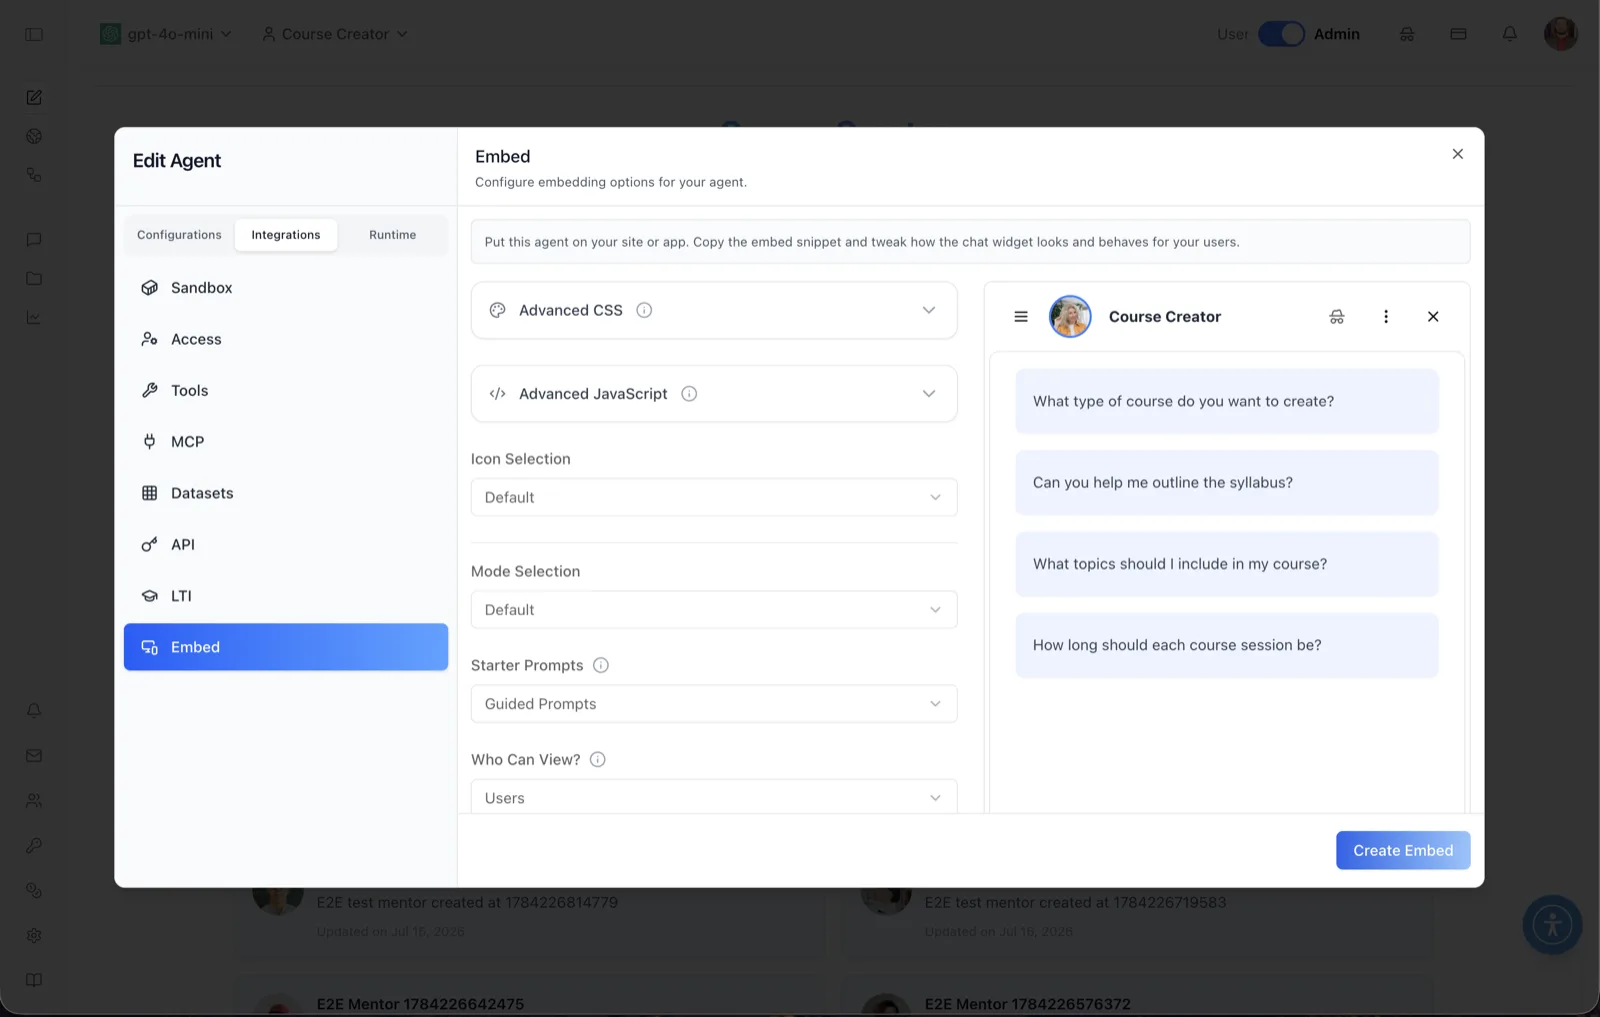
The Embed panel packages an agent as a chat widget for your own website or application. The header reads "Configure embedding options for your agent," and the intro banner summarizes the workflow: "Put this agent on your site or app. Copy the embed snippet and tweak how the chat widget looks and behaves for your users."
The left side of the panel holds the widget configuration — styling, scripting, icon, mode, starter prompts, and access controls — while the right side shows a live preview of the chat widget, including the agent's avatar, name, and its starter prompt suggestions. Clicking Create Embed generates the embed code for the current configuration.
To reach this panel, open the Edit Agent modal, switch the tab group at the top of the sidebar from Configurations to Integrations, and select Embed.
Target Audience
Administrator | Agent Builder
Settings Reference
Advanced CSS
A collapsible section for custom CSS applied to the embedded widget, letting you restyle it to match your site. The CSS is saved to the agent with its own Save action inside the section.
Advanced JavaScript
A collapsible section for custom JavaScript attached to the embed, for advanced behavior customization. Like the CSS section, it saves its script to the agent independently.
Icon Selection
A dropdown choosing the widget's floating launcher icon: Default or Custom. Choosing Custom reveals an Icon Editor and a Live Preview of the floating chat bubble, where you can configure its image, position (corner), colors, border, padding, text, and sizing.
Mode Selection
A dropdown choosing the widget chat mode: Default or Advanced.
Starter Prompts
A dropdown choosing which starter prompts the widget displays before the first message; the tooltip reads "Choose the type of starter prompts to display." Options are Guided Prompts (shown selected — the guided suggestions visible in the preview pane) and Suggested Prompts.
Who Can View?
The same agent visibility control found on the Settings → Discovery sub-tab, surfaced here because it governs whether embed viewers can see the agent; the tooltip reads "Control who can view this agent." A Who Can Chat? control (Anyone vs. Authenticated Users) follows it further down the form.
Widget preview
The right-hand pane renders the widget as end users will see it — header with the agent's avatar and name, plus the starter prompt buttons (in the screenshot: "What type of course do you want to create?", "Can you help me outline the syllabus?", "What topics should I include in my course?", "How long should each course session be?").
Create Embed
The primary button at the bottom-right. It submits the configuration (showing "Generating Embed" while it works) and then opens an Embedded Code dialog containing the generated snippet with a copy control, ready to paste into your site or app.
How to Use
Step 1: Open the Embed panel
Open the Edit Agent modal, click the Integrations tab above the sidebar, and select Embed.
Step 2: Configure the widget
Pick the Icon Selection, Mode Selection, and Starter Prompts options, and set Who Can View? (and Who Can Chat?) for embedded visitors. Watch the right-hand preview update to confirm the widget looks right.
Step 3: Optionally add CSS or JavaScript
Expand Advanced CSS or Advanced JavaScript to restyle the widget or attach custom behavior, and save each section.
Step 4: Generate the embed code
Click Create Embed. When the Embedded Code dialog appears, copy the snippet.
Step 5: Install on your site
Paste the snippet into your website or application where the widget should load.