Agent Settings: Voice Call
Overview
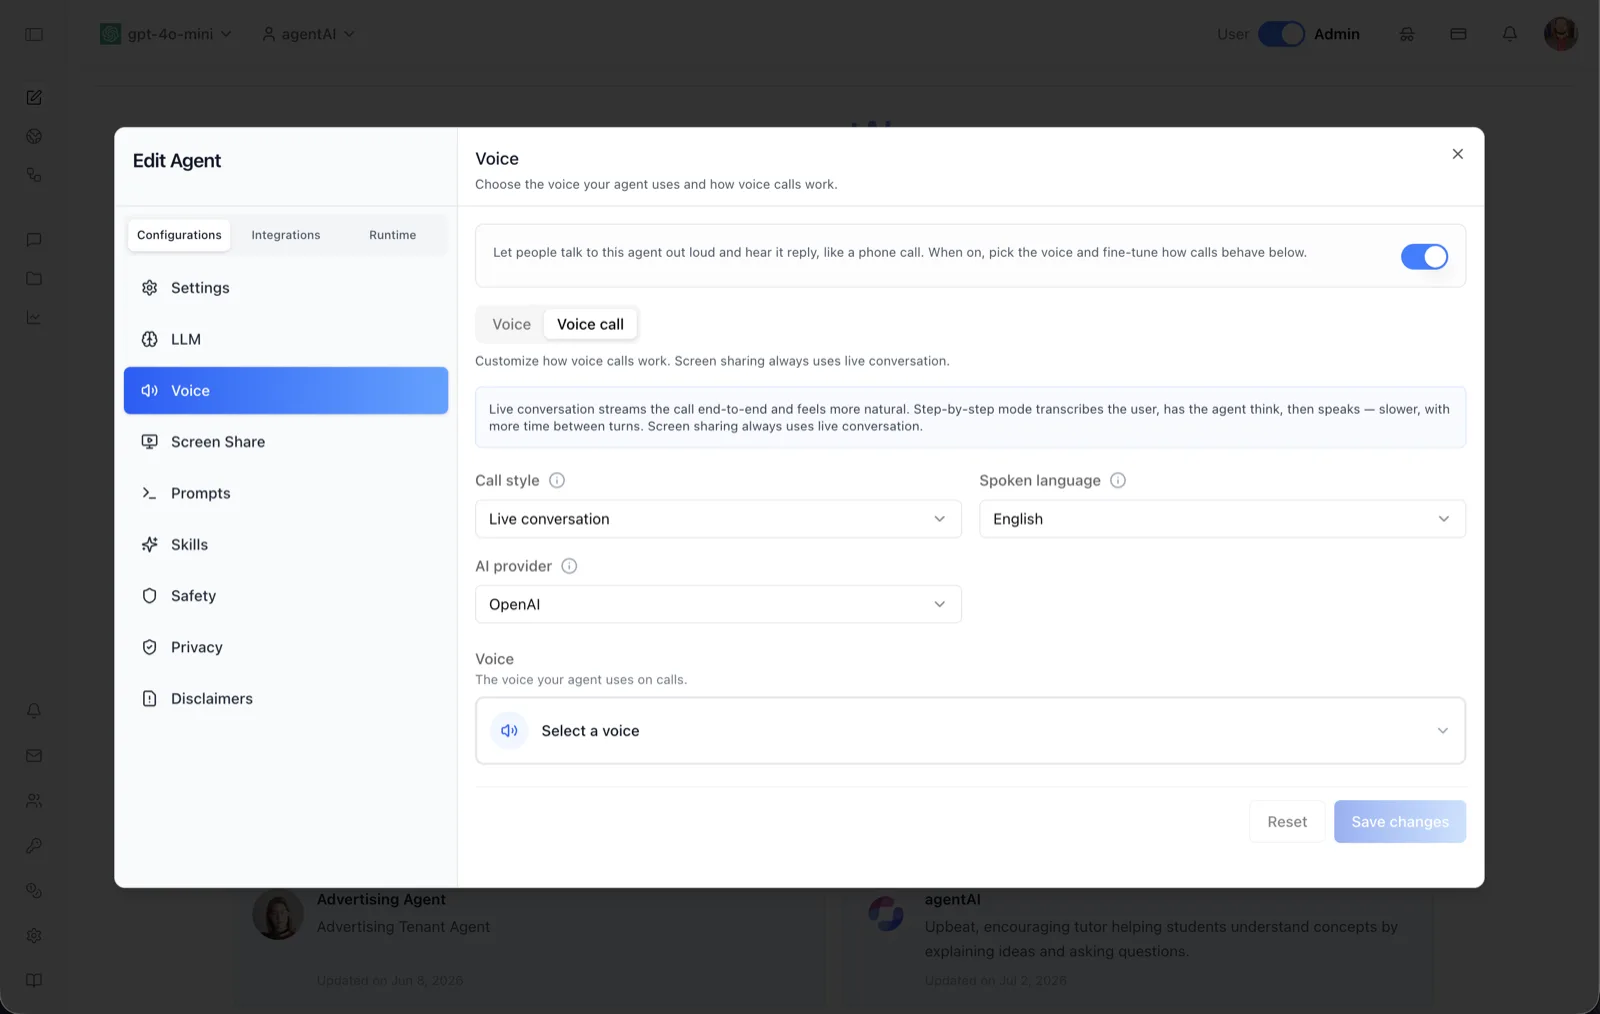
The Voice call sub-tab configures how live voice calls with an agent behave — the conversation style, the spoken language, the AI provider that powers the call, and the voice used on calls. Its helper text states: "Customize how voice calls work. Screen sharing always uses live conversation." Voice calls are real-time WebRTC sessions powered by LiveKit.
An info banner explains the two call styles: "Live conversation streams the call end-to-end and feels more natural. Step-by-step mode transcribes the user, has the agent think, then speaks — slower, with more time between turns. Screen sharing always uses live conversation."
To reach this screen, open the Edit Agent modal, select Voice in the Configurations sidebar, enable the voice toggle at the top, and switch to the Voice call sub-tab. Settings on this sub-tab are saved as a call configuration, separate from the chat voice chosen on the Voice sub-tab.
Target Audience
Administrator | Agent Builder
Settings Reference
Call style
A dropdown choosing between two modes:
- Live conversation — streams the call end-to-end for a natural, low-latency exchange.
- Step-by-step — transcribes the user's speech, lets the agent think, then speaks the reply; slower, with more time between turns.
Screen sharing sessions always use live conversation regardless of this setting.
Spoken language
A dropdown selecting the language the call is conducted in (English in the screenshot).
AI provider
A dropdown selecting which provider powers the call (OpenAI in the screenshot; OpenAI, Google, and Anthropic are the configurable provider options). Choosing a provider also determines which voices are available in the call voice picker below.
Voice
Labeled "The voice your agent uses on calls." Clicking Select a voice opens the same searchable voice picker used on the Voice sub-tab, scoped to the selected AI provider. The picker only appears once an AI provider has been chosen.
Additional step-by-step options
The call configuration also supports Text-to-speech provider and Speech-to-text provider selections (OpenAI, Google, or ElevenLabs); these are disabled when Call style is Live conversation, since live mode streams end-to-end. Toggles for "Look things up only when needed" (function calling during calls) and "Allow screen sharing on a call" are also part of the call configuration.
Reset and Save changes
Reset discards unsaved edits to the call configuration. The save button persists the configuration — it reads Save changes when updating an existing configuration (as in the screenshot) and Save when creating the first one.
How to Use
Step 1: Open the Voice call sub-tab
In the Edit Agent modal, go to Configurations → Voice, make sure the voice toggle at the top is on, then click the Voice call sub-tab.
Step 2: Choose a call style
Pick Live conversation for natural, streamed calls, or Step-by-step if you prefer transcribe-think-speak turns. Remember that screen sharing always uses live conversation.
Step 3: Set the language and provider
Select the Spoken language for calls and the AI provider that should power them.
Step 4: Pick the call voice
Click Select a voice and choose the voice the agent uses on calls; you can search and preview samples in the picker.
Step 5: Save
Click Save changes to persist the call configuration, or Reset to discard your edits.