Agent Settings: Discovery
Overview
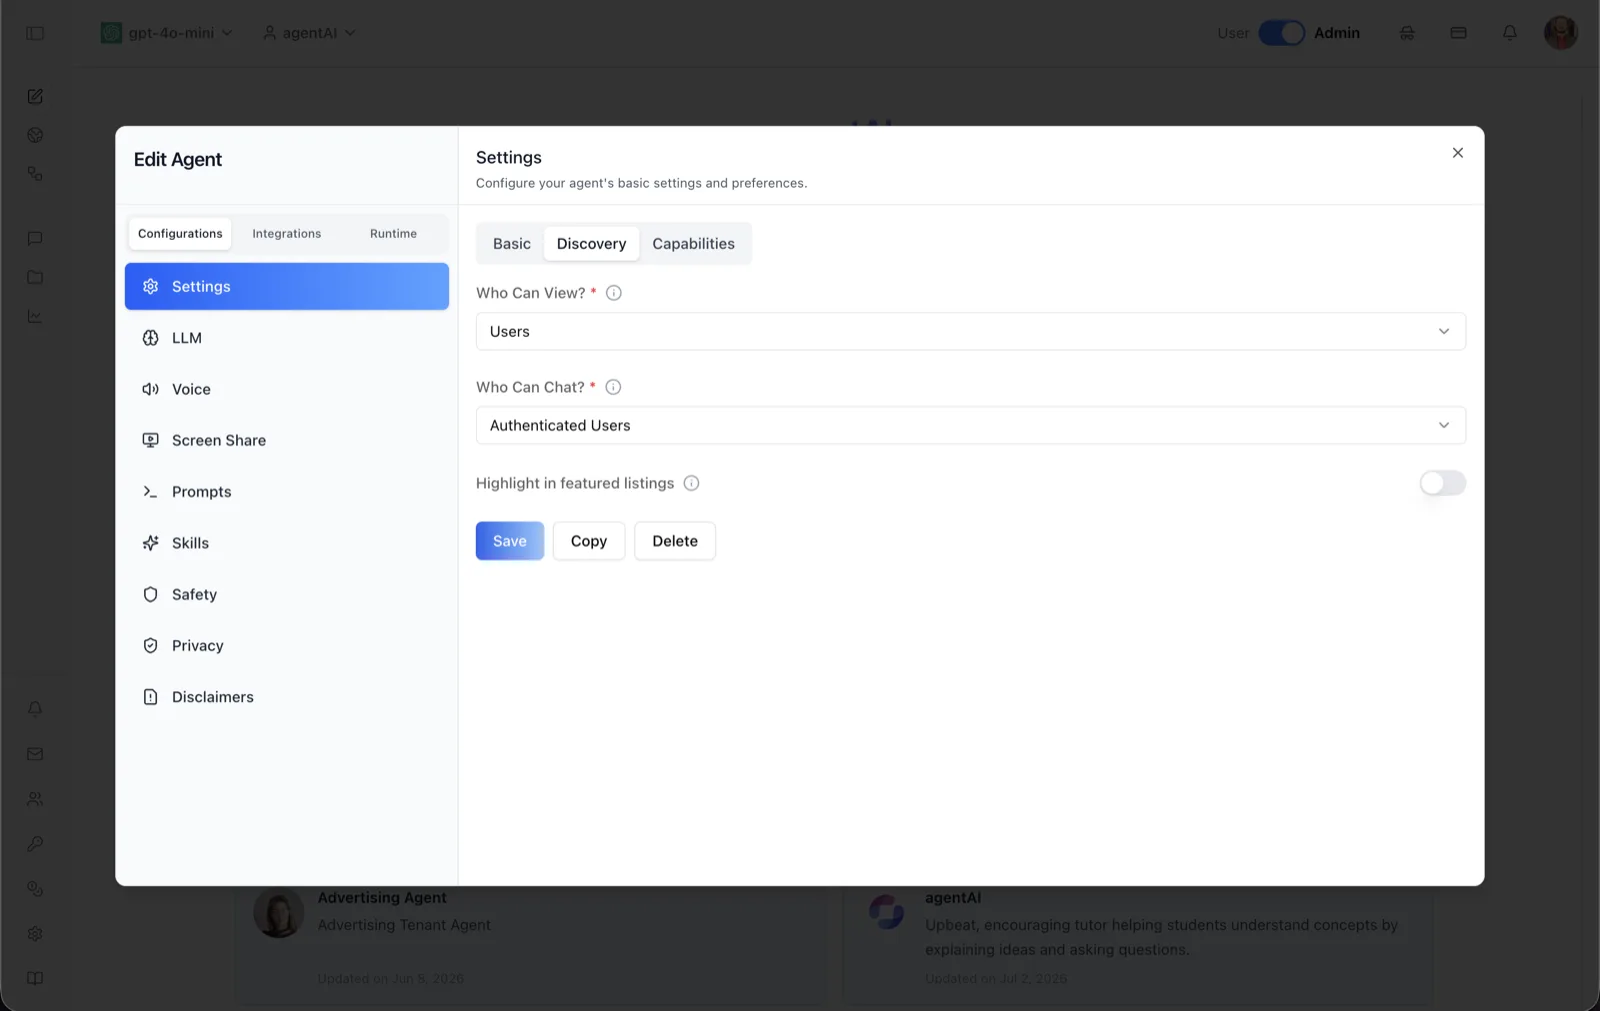
The Discovery sub-tab of the Settings panel controls who can find and use an agent, and whether it gets promoted in listings. The panel header reads: "Configure your agent's basic settings and preferences," and Discovery sits between the Basic and Capabilities sub-tabs at the top of the panel.
Its two required dropdowns separate visibility from usage: Who Can View? decides who sees the agent, while Who Can Chat? decides whether unauthenticated visitors may start conversations. A Highlight in featured listings toggle additionally promotes the agent in featured placements.
To reach this screen, open the Edit Agent modal, stay on the Configurations tab group, select Settings in the left sidebar, then click the Discovery sub-tab.
Target Audience
Administrator | Agent Builder
Settings Reference
Who Can View? (required)
A dropdown controlling who can see this agent; its tooltip reads "Control who can view this agent." The visibility levels defined for agents are administrator-only, platform users/students, and anyone — i.e. you can restrict the agent to organization administrators, open it to the organization's authenticated users (the "Users" value shown selected in the screenshot), or make it viewable by anyone.
Who Can Chat? (required)
A dropdown controlling who can start conversations with the agent; its tooltip reads "Control who can chat with this agent." The two options are Anyone (anonymous chat allowed) and Authenticated Users (shown selected — visitors must be signed in to chat).
Highlight in featured listings
A toggle whose tooltip reads: "Feature this agent to highlight it in listings." When on, the agent is marked as featured so it is surfaced prominently in agent listings. It is off in the screenshot.
Allow LTI launches
The Discovery sub-tab also defines an Allow LTI launches toggle (permission-gated, so it does not appear for every user). Its tooltip warns: "Allows this agent to be accessible via LTI launches. Unselecting this will immediately remove access for any users that have launched this via LTI."
Save, Copy, Delete
Save persists the Discovery form changes to the agent. Copy opens a dialog to duplicate the agent. Delete opens a confirmation dialog to delete the agent; it appears only for users with delete permission.
How to Use
Step 1: Open the Discovery sub-tab
Open the Edit Agent modal, keep Configurations selected, click Settings in the sidebar, then choose the Discovery sub-tab (between Basic and Capabilities).
Step 2: Set who can view
Pick a value in Who Can View? — restrict the agent to administrators while it is being built, open it to your organization's users, or make it visible to anyone when it is ready for broad discovery.
Step 3: Set who can chat
Pick Authenticated Users to require sign-in before chatting, or Anyone to allow anonymous conversations (for example, on a public-facing help agent).
Step 4: Optionally feature the agent
Turn on Highlight in featured listings if the agent should be promoted in featured placements.
Step 5: Save
Click Save to apply the changes. Use Copy if you want a duplicate of the agent to experiment with, or Delete to remove the agent entirely.