Agent Settings: LTI Links
Overview
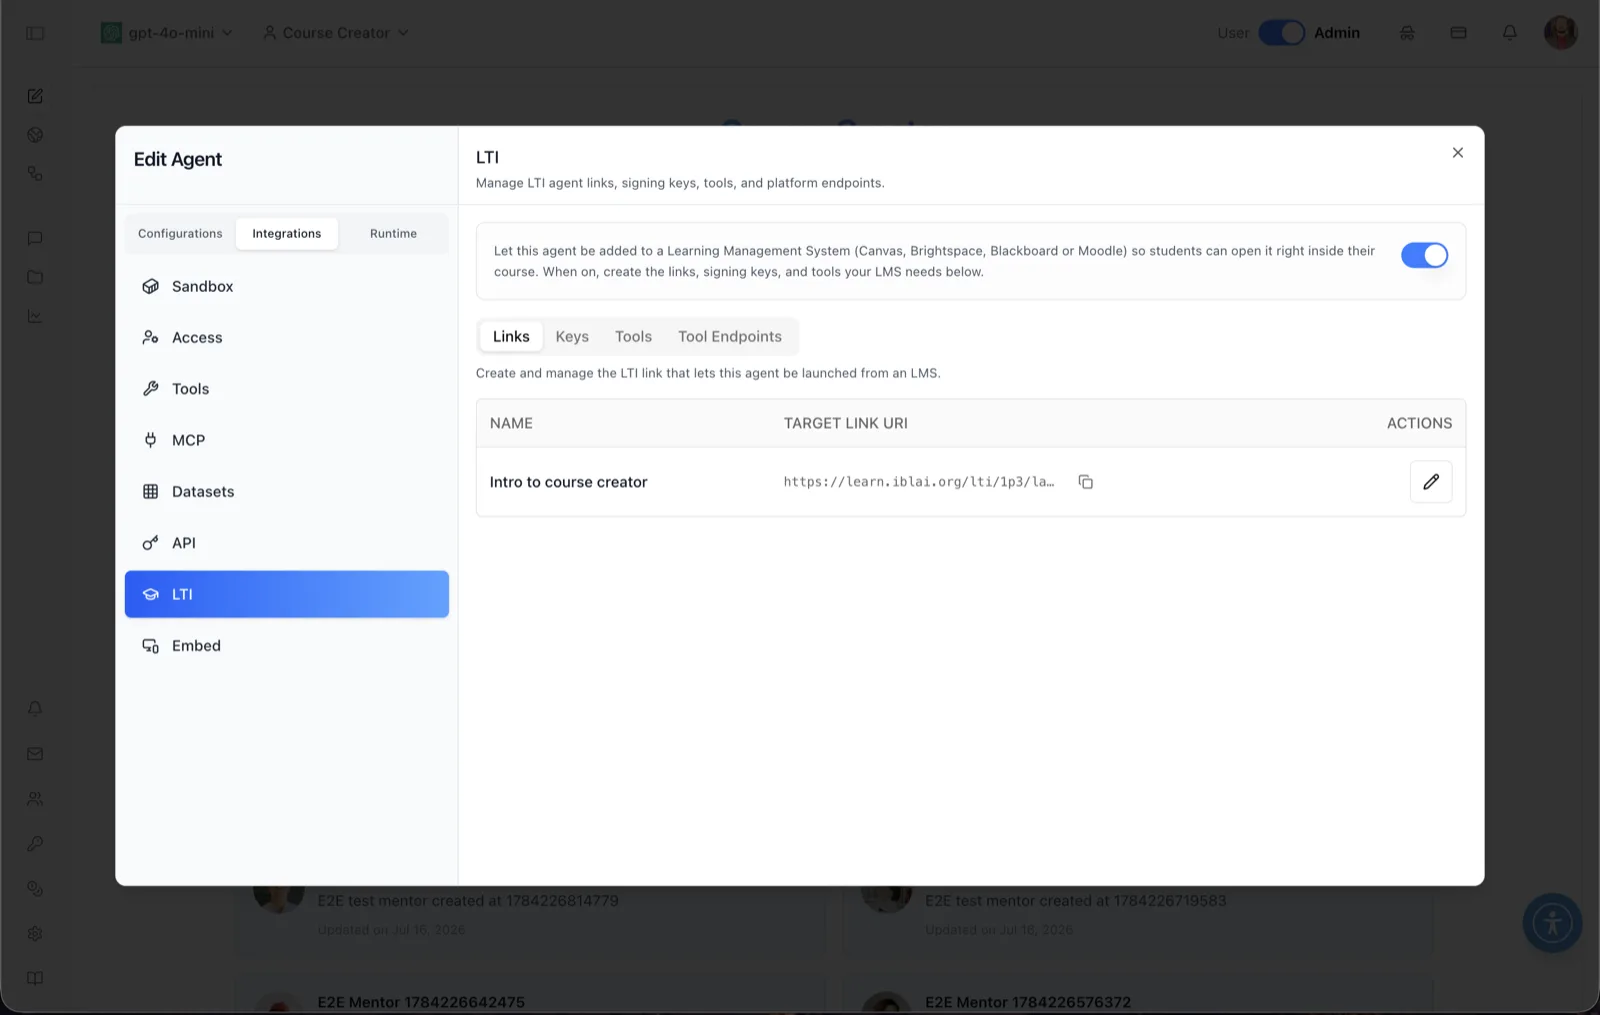
The Links sub-tab of the LTI panel manages the launch link that lets this agent be opened from a Learning Management System. The caption on this sub-tab explains: "Create and manage the LTI link that lets this agent be launched from an LMS." Unlike keys and tools, which are platform-wide, the link belongs to this specific agent — it is the target the LMS points at so students land in this agent.
Each link has a name and an auto-generated Target Link URI (for example https://learn.iblai.org/lti/1p3/la...). That URI is the value you paste into your LMS (Canvas, Brightspace, Blackboard, or Moodle) as the LTI target link so that launching the placement opens this agent inside the course. An agent has a single LTI link: once one exists, the create action is no longer offered and the existing link is managed in place.
To reach this screen, open the Edit Agent modal, switch to the Integrations tab group (its sidebar lists Sandbox, Access, Tools, MCP, Datasets, API, LTI, and Embed), select LTI, and click the Links sub-tab. The panel header reads: "Manage LTI agent links, signing keys, tools, and platform endpoints." The LTI panel is admin-only.
Target Audience
Administrator
Panel Reference
LTI enable toggle
The banner at the top of the LTI panel reads: "Let this agent be added to a Learning Management System (Canvas, Brightspace, Blackboard or Moodle) so students can open it right inside their course. When on, create the links, signing keys, and tools your LMS needs below." The toggle controls whether LTI launches are allowed for this agent — the same setting as Enable LTI launches in the agent's Settings. Creating a link requires it to be on.
Sub-tab bar
Four sub-tabs organize the LTI panel: Links (this sub-tab), Keys (platform-wide signing keys), Tools (registered LMS platforms), and Tool Endpoints (the fixed URLs to give your LMS).
Links table
The agent's LTI link is a row with:
- NAME — the link's display name (for example "Intro to course creator"), chosen when the link is created and editable afterwards. This is also the name shown when the agent is picked during deep-linking content selection in the LMS.
- TARGET LINK URI — the auto-generated launch URL for this agent, shown truncated with a copy button so it can be copied in full. It reads
—until the link has finished building. - STATUS — where the build has got to: Pending or Building in amber with a spinner, Ready in green, or Failed in red with a tooltip explaining why.
- ACTIONS — a pencil (edit) button that opens the link for renaming once it is ready, or a Retry button on a failed row.
When no link exists yet, the sub-tab shows an empty state with a create button; filling in a name and submitting starts the build.
Status, Refresh, and Retry
Creating a link is not instant. Behind it the platform provisions a course, which takes longer than a browser request should wait, so the link is created in the background: the row appears immediately as Pending, moves to Building, and lands on Ready with its Target Link URI filled in.
While any link is still building, a Refresh button sits above the table to re-check its state. A link that ends up Failed offers Retry in place of its edit action, which clears the failed attempt and starts a fresh build from the same details.
Editing is gated on readiness: a link can only be renamed once it is Ready, so a build in progress or a failed row cannot be edited in place.
How to Use
Step 1: Open the Links sub-tab
In the Edit Agent modal, go to Integrations → LTI. The Links sub-tab is the default. Make sure the LTI toggle at the top of the panel is on.
Step 2: Create the link
If the agent has no link yet, use the create action, enter a descriptive name, and submit. The row appears straight away as Pending. (Each agent has one LTI link.)
Step 3: Wait for the build, then copy the Target Link URI
The link builds in the background. Use Refresh to re-check it; once the status reads Ready, the Target Link URI is filled in and the copy button beside it gives you the full value. In your LMS, use this value as the placement's target link URI when adding the tool to a course. If the status ends up Failed, use Retry on that row rather than creating a second link.
Step 4: Complete the LMS side
The link works together with the rest of the LTI configuration: register the LMS on the Tools sub-tab (issuer, client ID, and a signing key from Keys) and give the LMS the fixed URLs from Tool Endpoints. Once both sides are registered, launching the placement in the LMS opens this agent inside the course.
Step 5: Rename when needed
Once the link is Ready, click the pencil icon to rename it — for example to match the course or placement it serves. The target URI itself is generated by the platform.
Behavior Notes
- Creating a link provisions a course, so it runs in the background. The row is created immediately in a pending state and finishes out of band; the Target Link URI only exists once the build completes.
- Creating a link switches LTI on. If the LTI toggle is off when you create the link, the agent is made LTI-accessible automatically rather than the create failing.
- Retry replaces, it does not repair. Retrying a failed link clears the failed attempt and starts a fresh build from the same name — there is never a second, half-built link left behind.
- The name is user-facing. It is what an instructor sees when picking this agent during deep-linking content selection, so it is worth naming for the course rather than for the agent.